Introduction
If there’s one dessert that has stood the test of time, it’s chocolate ice cream. There’s something magical about the velvety, creamy texture combined with the deep, rich flavor of chocolate that makes it universally loved. Whether you’re enjoying it on a hot summer day, as an after-dinner treat, or simply because you need a little comfort, chocolate ice cream never disappoints.
But have you ever wondered how to make the perfect chocolate ice cream recipe at home? The kind that’s super creamy, indulgent, and far better than anything you can get from the store? Well, you’re in luck! In this article, we’re going to walk you through an easy, foolproof method for making the best chocolate ice cream recipe that will leave you craving more.
Not only is this recipe simple, but it also provides that luxurious, creamy texture that’s hard to beat. If you love chocolate, or you simply want to elevate your homemade ice cream game, keep reading — this recipe is exactly what you’ve been searching for!
Recipe Card (using Tasty Recipes plugin) Chocolate Ice Cream Recipe
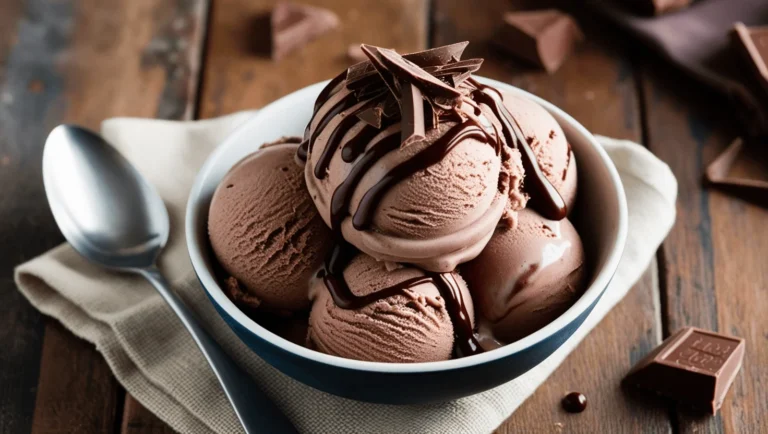
Recipe Name: Chocolate Ice Cream
Description: This chocolate ice cream recipe is a rich and creamy homemade delight made from cocoa powder and chocolate, creating a deeply satisfying treat that’s perfect for any chocolate lover.
Prep Time: 15 minutes
Cook Time: 25 minutes
Total Time: 3–4 hours (includes chilling and freezing)
Servings: 6–8 servings
Calories: 250 per serving
Ingredients:
- 2 cups heavy cream
- 1 cup whole milk
- 3/4 cup granulated sugar
- 1/2 cup unsweetened cocoa powder
- 4 oz semi-sweet chocolate, chopped
- 4 large egg yolks
- 1 tsp vanilla extract
- Pinch of salt
Instructions:
- In a medium saucepan, combine the milk, heavy cream, and cocoa powder. Heat over medium heat, whisking constantly, until the mixture is smooth and begins to simmer.
- In a separate bowl, whisk the egg yolks with the sugar until pale and thick.
- Slowly pour the hot milk mixture into the egg yolks, whisking constantly to prevent curdling.
- Return the mixture to the saucepan and cook over medium heat, stirring constantly, until it thickens enough to coat the back of a spoon.
- Remove from heat and add the chopped chocolate, whisking until fully melted and smooth.
- Stir in the vanilla extract and pinch of salt. Let the mixture cool to room temperature.
- Once cooled, transfer the mixture to an ice cream maker and churn according to the manufacturer’s instructions.
- Transfer the churned ice cream to an airtight container and freeze for 2-3 hours until firm.
Notes:
- If you don’t have an ice cream maker, pour the mixture into a shallow pan and freeze, stirring every 30 minutes until it reaches your desired texture.
- For extra richness, use a combination of dark chocolate and semi-sweet chocolate.
Nutrition Information (per serving):
- Calories: 250
- Protein: 4g
- Carbs: 28g
- Fat: 14g
- Fiber: 2g
- Sugar: 22g
Why You’ll Love This Chocolate Ice Cream Recipe
- Easy to Make: The process of making chocolate ice cream is straightforward, with easy-to-find ingredients and minimal equipment needed.
- Super Creamy Texture: The combination of heavy cream and egg yolks creates a rich, creamy base that delivers that perfect ice cream texture.
- Indulgent Flavor: Rich cocoa powder and real chocolate give this ice cream a depth of flavor that’s hard to beat.
- Customizable: You can easily adjust the sweetness, chocolate intensity, and mix-ins to create a flavor that’s perfect for you.
- Homemade Goodness: There’s nothing like enjoying a homemade dessert knowing it’s made with love and quality ingredients. Plus, it’s free from artificial preservatives or colors!
Chocolate Ice Cream Recipe ingredients and Substitutions
1. Heavy Cream
Heavy cream is the foundation of creamy ice cream. It provides the luscious texture and helps create that melt-in-your-mouth feel. You can substitute it with half-and-half for a lighter version, but it may slightly affect the creaminess.
2. Whole Milk
Whole milk is another important ingredient that adds richness to the ice cream. If you’re looking to reduce calories or fat, you can swap it out for a lower-fat milk, but the ice cream won’t be quite as creamy.
3. Unsweetened Cocoa Powder
For the best flavor, use a high-quality unsweetened cocoa powder. This will provide the chocolatey base without added sugars. If you prefer a darker, more intense flavor, opt for Dutch-processed cocoa powder.
4. Semi-Sweet Chocolate
Real chocolate gives this chocolate ice cream a deep, authentic chocolate flavor. Semi-sweet chocolate is the best option, but you can use milk chocolate for a sweeter, creamier ice cream, or even dark chocolate if you prefer a more intense chocolate taste.
5. Egg Yolks
Egg yolks create a smooth, custard-like base and add richness to the ice cream. If you’re concerned about using raw eggs, you can use pasteurized eggs or skip this ingredient for a simpler ice cream base, though it may not be quite as creamy.
How to Make Chocolate Ice Cream recipe (Step-by-Step)
Step 1: Heat the Milk and Cream
In a medium saucepan, combine the heavy cream, whole milk, and unsweetened cocoa powder. Heat this mixture over medium heat, whisking constantly until it becomes smooth and starts to simmer. Be sure not to let it boil, as it can affect the texture and taste of the ice cream.
Step 2: Whisk the Egg Yolks and Sugar
In a separate bowl, whisk the egg yolks and sugar together until the mixture becomes thick, pale, and smooth. This process is crucial as it helps to incorporate the sugar into the yolks and prepares them for cooking.
Step 3: Temper the Eggs
Slowly pour a small amount of the hot milk mixture into the egg yolk mixture while whisking constantly. This process is called “tempering,” and it ensures the eggs don’t curdle when added to the hot milk. Gradually add the rest of the hot mixture into the egg yolks, whisking continuously.
Step 4: Cook the Custard
Return the mixture to the saucepan and cook over medium heat, stirring constantly. You’ll know it’s done when it thickens enough to coat the back of a spoon. This is your custard base, and it’s what gives the ice cream its smooth, creamy texture.
Step 5: Add the Chocolate and Vanilla
Once the custard has thickened, remove it from the heat and stir in the chopped semi-sweet chocolate. Continue whisking until the chocolate is fully melted and the mixture is smooth. Add the vanilla extract and a pinch of salt for extra flavor.
Step 6: Chill the Mixture
Let the custard cool to room temperature. To speed up the cooling process, place the saucepan in an ice bath. Once cooled, cover the mixture and refrigerate for at least 2 hours or overnight. Chilling the mixture helps the ice cream base firm up and ensures the final texture is rich and smooth.
Step 7: Churn the Ice Cream
After chilling, pour the custard into your ice cream maker and churn according to the manufacturer’s instructions. This process usually takes around 20–25 minutes.
Step 8: Freeze Until Firm
Once the ice cream has churned to a soft-serve consistency, transfer it to an airtight container. Freeze for an additional 2–3 hours until it’s firm and ready to serve.
Expert Tips for Success Chocolate Ice Cream Recipe
- Temper the eggs slowly: This is a crucial step to avoid scrambling the eggs. Always pour the hot liquid into the eggs gradually, and whisk constantly.
- Use high-quality chocolate: The better the chocolate, the better your ice cream will taste. Choose semi-sweet or bittersweet chocolate for a more intense flavor.
- Don’t rush the chilling process: Let the ice cream base chill thoroughly before churning. This ensures a creamier texture.
- Keep the ice cream machine chilled: For best results, ensure your ice cream maker’s bowl is fully frozen before you start churning.
Variations and Customizations for Chocolate Ice Cream Recipe
- Add-ins and Mix-ins: Try adding chocolate chips, swirls of caramel, or chopped nuts for texture. Fold them in after churning.
- Non-dairy Option: Use coconut milk or almond milk in place of dairy for a vegan version. Be aware that coconut milk can give the ice cream a slight coconut flavor.
- Mint Chocolate Ice Cream: Add a few drops of mint extract along with the vanilla for a refreshing twist.
Storage and Reheating Instructions for Chocolate Ice Cream Recipe
Storage:
Store the ice cream in an airtight container in the freezer. It will keep for up to two weeks, but it’s best enjoyed within the first few days for the freshest taste.
Reheating:
If the ice cream becomes too hard to scoop, let it sit at room temperature for 5–10 minutes to soften before serving.
Serving Suggestions Chocolate Ice Cream Recipe
Chocolate Ice Cream pairs beautifully with many desserts. Here are a few ideas to serve it with:
- Chocolate cake or brownies for a double-chocolate indulgence.
- Fresh berries like raspberries or strawberries for a fresh contrast to the richness.
- Waffle cones or sugar cookies for a crunchy bite.
- Whipped cream and chocolate shavings for a fancy touch.
Frequently Asked Questions (FAQs) about Chocolate Ice Cream Recipe
Q1: Can I make chocolate ice cream without an ice cream maker?
Answer: Yes! If you don’t have an ice cream maker, pour the cooled mixture into a shallow pan and freeze. Stir every 30 minutes until the ice cream firms up.
Q2: Can I use milk chocolate instead of semi-sweet?
Answer: Absolutely! If you prefer a sweeter ice cream, you can use milk chocolate. Just keep in mind that it will be less intense in flavor.
Q3: How do I make the ice cream softer?
Answer: If you prefer softer ice cream, reduce the amount of sugar or use less cream. Also, adding a tablespoon of vodka before freezing can help create a softer texture.
Related Recipes
If you love this chocolate ice cream recipe, you may also enjoy:
- Vanilla Ice Cream Recipe
- Mint Chocolate Chip Ice Cream
- Coffee Ice Cream
- Strawberry Sorbet
Conclusion
Making your own chocolate ice cream at home is a rewarding experience that results in a decadent, creamy treat you can enjoy any time. With just a few simple ingredients and some patience, you can create a dessert that rivals anything from the store. Whether you’re indulging in a bowl after dinner or serving it at a gathering, this recipe is sure to impress.